Burning text is a great looking special effect and it can be achieved with relative ease in Photoshop. Even a glossy looking surface reflection is easy to pull off. This tutorial shows how to make flaming text, but the technique will work with any kind of object. Here's what the finished product looks like from this tutorial:

Step 1
Let's get started by creating a new document and filling it with black. I made mine 800 by 800 pixels, but you can pick any size depending on how much text you need to fit in.Step 2
Time to put down the text we want to see burning. I just used the word "FIRE" for this example. I used the Arial Black font at 250 points since I thought the block letters would look more intense. Put the text in white. After you've typed in what you want, choose Layer->Rasterize->Type to turn the text into pixels. Then use the Move tool  reposition the text so that it's centered horizontally and is just a little below the center line vertically. Here's what it should look like at this point:
reposition the text so that it's centered horizontally and is just a little below the center line vertically. Here's what it should look like at this point:
Step 3
Duplicate the layer with the text on it. We're going to use the duplicate to create the foreground text effect and the original text layer to create the rising flames illusion. Your layers should look like those to the right. We're going to work on the middle layer next, so make sure it's selected and highlighted as shown here.

Step 4
To get the flames rising, we're going to use the Wind filter. This filter only works going to the left or right, so we have to rotate our canvas first. Choose Image->Rotate Canvas->90 CW. Make sure the middle layer is still selected and choose Filter->Stylize->Wind. Select "Wind" and "From the Left" in the options and click OK. We need more wind than one application of the filter provides, so hit Cmd-F four times (or cntl-F if you're on Windows) to apply the filter four more times. You can use more or less applications depending on how high you want the flames to go. Finally, rotate the canvas back to normal with Image->Rotate Canvas-> 90 CCW. This is what it should look like now:
Step 5
Now we need to make the wind streaks look more like flames by blurring them together. Select Filter->Blur->Gaussian Blur and set the radius to 3 (make sure you still have the middle layer selected). You can use more or less blur depending on how you want the flames to look. Here's what I got so far: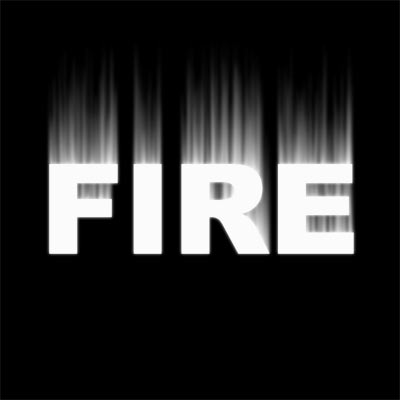
Step 6
The next step is to give our flame layer a black background which will be needed for the next step. To do this, duplicate Layer 1 (our original background layer) and merge this duplicate layer with the blurred text layer we just made. This won't change the look of the image just yet, but your layers should now look like those to the right.


Step 7
With the middle layer still selected, go to Filter->Liquify. We'll use this to give the flames a wavy look. I set the brush size to 80, density to 11 and pressure to 92. Now take the Warp tool and push the streaks around to get a sort of rising "S" pattern over the letters. Also push a bit around the sides of the letters to show some flames coming from the sides, and don't forget to work around the inside of the "F", "R" and the "E". This step takes a little practice, but it's not too hard. When you're happy with what you see, hit OK. Here's mine
Step 8
Time for some color. Select Image->Adjustments->Hue/Saturation and select Colorize so we can fiddle with the color. Bring Saturation up to 100 and set
Step 9
Duplicate this colorized layer and select this duplicate in the layers palette. Select Image->Adjustments->Hue/Saturation again, this time with Colorize off. Set the Hue

step10
Next we want to add some color to the top text layer that just has white letters at the moment. So click on the top layer to make it active and click on the Lock Transparency icon above the layer. This protects all the transparent pixels in the layer from changes so we can change the color of the text alone. We'll make the text a gradient from yellow tbrown, so set the foreground color to #f9e400 and the background color to #a36a06 (you may vary these). Select the Gradient Tool and swipe a gradient from top to bottom across the letters. Because of the locked transparency, only the text is affected by the gradient tool

step 11
A Layer Style will be used next to add more depth to the letters. We'll add a Drop Shadow first using the settings shown below. The color I used in the Blend Mode is a shade of orange #ee6a00
Don't click OK just yet since we have one more thing to set
step 12
Now we'll add a red Inner Shadow. I used color #ec0606 for the Blend color

Click OK. Our burning text effect is looking pretty good at this point:

Choose Layer->Merge Visible to collapse all the layers together. You can stop here if the text effect is all you need. But we can also take it further by adding a reflection in the foreground. This is a great way to add more depth and it's quite easy