...............................................................
How To Create A Password Reset Disk For XP ?
To create a password reset disk:
 1) Insert a blank floppy disk into drive.
2) Open User Accounts in Control Panel.
3) Double-click on your account name.
4) On the left side of the window, under Related Tasks, select Prevent a forgotten password. A wizard will pop up and walk you through the process of creating the password recovery disk. If the related tasks does not show up you are not double clicking on the user account or you are using a LAN with domains.
*If your computer is on a domain, you can create the Domain Password Reset Disk as follows. 1) Press CTRL+ALT+DELETE to open the Windows Security dialog box.
2) Click Change Password.
3) In the “Log on to” click on the down arrow to select local XP machine.
4) Click Backup to open the Forgotten Password Wizard. If you don’t see the Backup button you did not select the computer in step 3 correctly.
5) Click Next and then follow the instructions as they appear on the screen.
You will be prompted to create a new password. Remember, anyone who has the password reset disk can access the system, so don’t forget to store your disk in a safe place! ............................................................................................................................................
How to convert FAT32 to NTFS file system without the need of formatting or suffering from Data loss. What is NTFS and FAT32?
They are formats (file systems) for your hard drive. For Windows 98SE and before, FAT32 or FAT16 is the file type for your hard disk. NTFS is the standard for Windows XP. People say that NTFS is faster than FAT32, as it is far superior. Especially when defragmenting, FAT32 is way slower.
 When Can You Use This?
When you buy a external harddrive, the standard is FAT32. Annoying. Moreover, some WinXP installations (in particular, XP upgrades) are done on FAT32 drives.
So, Why Use NTFS over FAT32?
Let’s say you have FAT32. You want to unrar a large file (> 4 GB) and Windows tells you that you cannot unpack it because you don’t have enough hard drive space. Even if you do, you’ll still generate this error. This is because FAT32 drives do not support large files on it (anything over 4 GB).
Consequences:
I’m not responsible for your actions! When converting FAT32 to NTFS, you WILL NOT LOSE any files or data; however, there’s always the chance that something can go wrong (remember, it is Microsoft, by the way).
Solution / How to Do It:
You don’t need to install a program to change the filetype from FAT32 to NTFS.
1. Press the Start button.
2. Go to Run…
3. Type in "cmd" without the quotes, press OK.
4. Go to your C:/ folder, by typing in cd\, (or "cd.."just as long till you have reached C:/ ). See above image. Likewise, type in "cd c:\" works, as well.
5. Go to your "My Computer" icon, and see the name of the letter that stands in from of the drive you want to convert!
6. Back in cmd, Press in "CONVERT X: /FS:NTFS" (without the quotes). The X is for the letter your system drive, or external drive name. (see Step 5)
7. On the question ‘convert lost chains top files Y/N?‘ press ‘y‘ and continue.
8. cmd will now check the file system and the rest. If your cmd finishes, your file system is converted to NTFS. You can close down cmd. (If you want to check if it really did finished, go to ‘My Computer’ and right click on the drive, select ‘Properties’ to see what kind of file system it has).
9. If cmd says: ‘X: was not converted to NFTS, the conversion failed etc, you must follow the next steps!
10. As you can see above, my cmd failed the first time. Next solution.
11. Type in "chkdsk X: /f", where X is the letter of your drive. Wait a while to finish.
12. You’ll be asked to ‘convert lost chains top files Y/N?‘ press ‘y‘ and continue. Wait for it to finish.
13. After this, cmd will say that converting was successful. Check it by going to your computer, and single click on the drive to see what kind of file system your drive has. You may need to repeat step 6.
I tried this with my Transcend 250GB portable usb drive, worked perfectly well.
..............................................................................................................................................How to see Deleted History.

Follow the steps:
1. Boot into "safe mode command prompt" using F8
2. Go to Root (C:\) by typing CD\
3. Now type C:\ del
4. Press ENTER
The deleted files will appear. Note: Here C: is my OS. ...........................................................................................................................
How to increase windows startup speed by windows registry configuration.
When we start our computer it delays for a while to make your computer ready for action. You can reduce this delaying time completely by editing a simple thing in the registry setting. It will not harm your computer.
Note: This will boost in starting the windows. This will not increase the overall performance of your computer. The performance speed depends on the processor of your computer and the load it is taking on.
The process: Step 1: Click Run and then type Regedit.
Step 2: Now you will notice a box will pop up. From there Select HKEY_CURRENT_USER. Then Select control Panel , then Desktop Folder.
Step 3: Now in the right hand side you will see lots of settings. From there select "Menu Show Delay". Double click on it and changed the default value "400" to "0".
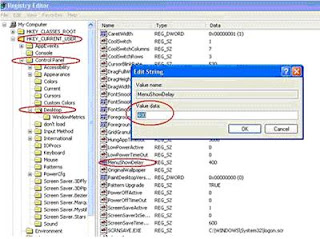 Now you are done. You will notice a slight increase in the loading time when you start your computer. If you increase the value to "1000" then it will take longer time to show the Menu.
This tricks does not make any difference actually. But learning it is not a bad Idea. Is it?
Hope you have enjoyed it. Cheers :)
............................................................................................................................................
Control Panel Files [CPL's]
File name Purpose
-----------------------------------------------------------------------
Access.cpl Accessibility properties
Appwiz.cpl Add/Remove Programs properties
Desk.cpl Display properties
FindFast.cpl FindFast (included with Microsoft Office for Windows 95)
Inetcpl.cpl Internet properties
Intl.cpl Regional Settings properties
Joy.cpl Joystick properties
Main.cpl Mouse, Fonts, Keyboard, and Printers properties
Mlcfg32.cpl Microsoft Exchange or Windows Messaging properties
Mmsys.cpl Multimedia properties
Modem.cpl Modem properties
Netcpl.cpl Network properties
Odbccp32.cpl Data Sources (32-bit ODBC, included w/ Microsoft Office)
Password.cpl Password properties
Sticpl.cpl Scanners and Cameras properties
Sysdm.cpl System properties and Add New Hardware wizard
Themes.cpl Desktop Themes
TimeDate.cpl Date/Time properties
Wgpocpl.cpl Microsoft Mail Post Office
....................................................................................................
Installing Modem. Wrong Comm Port.The reason that your modem is going to COM3 is because COM2 is active on the motherboard, here is
what you should do in details: 1. Start > Settings > Control Panel 2. Click on Device Manager 3. Expand the modem section 4. Remove the modem 5. Restart your system 6. When you see in DOS the HIT DEL TO ENTER SETUP, do that: 7. In the BIOS I want you to go to where it says COM2 and its address, and DISABLE it, put it to NONE. 8. Now let the system start 9. In windows let it detect your modem, BUT use your modem installation
Rebuild System files with Sys.com CommandCopy your SYS.COM to your startup disk, it's in your C:\WINDOWS\COMMAND directory. Then boot to Dos and switch to A:\> and type "SYS C:" no qoutes then [Enter]. This will rebuild your IO.SYS, COMMAND.COM and MSDOS.SYS on your harddrive. Then try rebooting. If no luck, read on.
Extract a new Win.comYou can't extract Win.com as it is created by windows 95 during install. You can, however, extract a file called Win.cnf and rename it Win.com, which is what occurs during the windows setup. To extract from CD, 1st Change Directories to the X:\WIN95> prompt, where X is your CD-ROM's drive letter. Then type the following:
EXTRACT /A /L C:\Windows WIN95_02.CAB WIN.CNF
You Need a Boot MenuYou can do this in windows, I think Dos is a better way. Boot and Shutdown To Real Dos Mode First, configure your system to boot
to DOS: At you Dos Prompt type; ATTRIB -H -S -R -S MSDOS.SYS
Then type: Edit MSDOS.SYS.
In the MSDOS.SYS file, make this changes.
[Options]
BootGUI=0
BootKeys=1
BootMenu=1
LOGO=0
BootDelay=0
After you save and exit EDIT Type ATTRIB +H +S +R +S
Reboot to a new menu. .........................................................................................................................BootStrap; Phase 1, 2, 3 and 4Phase 1: Hardware phase Power supply stabilizes voltages, asserts Power Good line to mobo CPU rolls; hds, fans and some other devices initialize themselves Phase 2: BIOS hardware phase BIOS initializes, checks crucial hardware, checks CMOS checksum Searches UMBs for ROM signatures, passes control to init (VGA splash) Loads chipset settings, sizes/checks RAM, builds equipment list (POST) BIOS splash screen displayed PnP extension queries and activates devices, checks ESCD data PnP-identified devices explained If changes, ESCD data is rebuilt (Updating ESCD...) Checks "advanced" CMOS for boot device test order Tests each device for boot signature end of 1st sector
If finds boot signature, loads that sector and jumps into it Else jumps to IBM cassette BASIC or "No ROM BASIC" etc. Phase 3: Master Boot Record phase It is at this point that EZIDE, Disk Manager, some viruses etc. run If diskette, boot sector loads OS however it chooses; IO.sys etc. If hd, partition table's 4 entries checked for marker with bit 7 set Error if no active partition found Else active partition table entry consulted for start address Check for boot sector marker at end 1st sector of partition Error if not found Else jumps into 1st sector of partition Phase 4: Operating system phase From here on, what happens depends on the operating system It is at this point the other "pre-file" viruses run Case of successfully-installed Win95 will be described Partition loader loads IO.sys; "Windows 95 is loading..." Win95's IO.sys will interpret MSDOS.sys settings, act accordingly If no Fn keystroke or bad exit to the contrary, interprets Config.sys Initial interpretation of registry (*** here or where?)
If no DOS=NoAuto, will set and load Win95 auto defaults as per:
LastDriveHigh
FilesHigh
BuffersHigh
StacksHigh
FCBSHigh
DOS=UMB,High (NB if Single, UMB only possible if Emm386 loads)
Set Prompt=$p$g (*** here or earlier?)
Set Path={winbasedir};{winbasedir}\Command (*** here or earlier?)
Device={winbasedir}\HiMem.sys
DeviceHigh={winbasedir}\IFSHlp.sys
DeviceHigh={winbasedir}\SetVer.exe
Rest of Config.sys interpreted
Check for C:\AutoExec.bat; if exists, Command.com loaded to interpret
If no DOS=Single (Config.sys) or BootGUI=0 (MSDOS.sys), Win.com loads
(*** from this point on, exact order of events unclear; ### waypoints)
Win.com displays {winbasedir}\Logo.sys (*** here or earlier?) (###)
Registry drivers, PnP etc. loaded
System.ini drivers etc. loaded
Desktop paints in, mouse pointer; Task Manager is clickable (###)
Logon dialog appears, if appropriate (###)
0th instance Explorer launches, desktop icons, Desktop clickable (###)
Registry Run, RunOnce, RunServices, RunServicesOnce interpreted
Win.ini Run= and Load= interpreted
"Welcome to Windows" dialog launched, unless suppressed (###)
{start menu}\StartUp group items launched At this point, boot process is complete.

2) Open User Accounts in Control Panel.
3) Double-click on your account name.
4) On the left side of the window, under Related Tasks, select Prevent a forgotten password. A wizard will pop up and walk you through the process of creating the password recovery disk. If the related tasks does not show up you are not double clicking on the user account or you are using a LAN with domains.
*If your computer is on a domain, you can create the Domain Password Reset Disk as follows.

2) Click Change Password.
3) In the “Log on to” click on the down arrow to select local XP machine.
4) Click Backup to open the Forgotten Password Wizard. If you don’t see the Backup button you did not select the computer in step 3 correctly.
5) Click Next and then follow the instructions as they appear on the screen.
You will be prompted to create a new password. Remember, anyone who has the password reset disk can access the system, so don’t forget to store your disk in a safe place!
How to convert FAT32 to NTFS file system without the need of formatting or suffering from Data loss. What is NTFS and FAT32?
They are formats (file systems) for your hard drive. For Windows 98SE and before, FAT32 or FAT16 is the file type for your hard disk. NTFS is the standard for Windows XP. People say that NTFS is faster than FAT32, as it is far superior. Especially when defragmenting, FAT32 is way slower.

When Can You Use This?
When you buy a external harddrive, the standard is FAT32. Annoying. Moreover, some WinXP installations (in particular, XP upgrades) are done on FAT32 drives.
So, Why Use NTFS over FAT32?
Let’s say you have FAT32. You want to unrar a large file (> 4 GB) and Windows tells you that you cannot unpack it because you don’t have enough hard drive space. Even if you do, you’ll still generate this error. This is because FAT32 drives do not support large files on it (anything over 4 GB).
Consequences:
I’m not responsible for your actions! When converting FAT32 to NTFS, you WILL NOT LOSE any files or data; however, there’s always the chance that something can go wrong (remember, it is Microsoft, by the way).
Solution / How to Do It:
You don’t need to install a program to change the filetype from FAT32 to NTFS.
1. Press the Start button.
2. Go to Run…
3. Type in "cmd" without the quotes, press OK.
4. Go to your C:/ folder, by typing in cd\, (or "cd.."just as long till you have reached C:/ ). See above image. Likewise, type in "cd c:\" works, as well.
5. Go to your "My Computer" icon, and see the name of the letter that stands in from of the drive you want to convert!
6. Back in cmd, Press in "CONVERT X: /FS:NTFS" (without the quotes). The X is for the letter your system drive, or external drive name. (see Step 5)
7. On the question ‘convert lost chains top files Y/N?‘ press ‘y‘ and continue.
8. cmd will now check the file system and the rest. If your cmd finishes, your file system is converted to NTFS. You can close down cmd. (If you want to check if it really did finished, go to ‘My Computer’ and right click on the drive, select ‘Properties’ to see what kind of file system it has).
9. If cmd says: ‘X: was not converted to NFTS, the conversion failed etc, you must follow the next steps!
10. As you can see above, my cmd failed the first time. Next solution.
11. Type in "chkdsk X: /f", where X is the letter of your drive. Wait a while to finish.
12. You’ll be asked to ‘convert lost chains top files Y/N?‘ press ‘y‘ and continue. Wait for it to finish.
13. After this, cmd will say that converting was successful. Check it by going to your computer, and single click on the drive to see what kind of file system your drive has. You may need to repeat step 6.
I tried this with my Transcend 250GB portable usb drive, worked perfectly well.
..............................................................................................................................................
How to see Deleted History.

Follow the steps:
1. Boot into "safe mode command prompt" using F8
2. Go to Root (C:\) by typing CD\
3. Now type C:\ del
4. Press ENTER
The deleted files will appear. Note: Here C: is my OS. ...........................................................................................................................
Follow the steps:
1. Boot into "safe mode command prompt" using F8
2. Go to Root (C:\) by typing CD\
3. Now type C:\del
4. Press ENTER
The deleted files will appear. Note: Here C: is my OS.
1. Boot into "safe mode command prompt" using F8
2. Go to Root (C:\) by typing CD\
3. Now type C:\
4. Press ENTER
The deleted files will appear. Note: Here C: is my OS.
...........................................................................................................................
How to increase windows startup speed by windows registry configuration.
When we start our computer it delays for a while to make your computer ready for action. You can reduce this delaying time completely by editing a simple thing in the registry setting. It will not harm your computer.
Note: This will boost in starting the windows. This will not increase the overall performance of your computer. The performance speed depends on the processor of your computer and the load it is taking on.
The process: Step 1: Click Run and then type Regedit.
Step 2: Now you will notice a box will pop up. From there Select HKEY_CURRENT_USER. Then Select control Panel , then Desktop Folder.
Step 3: Now in the right hand side you will see lots of settings. From there select "Menu Show Delay". Double click on it and changed the default value "400" to "0".

Now you are done. You will notice a slight increase in the loading time when you start your computer. If you increase the value to "1000" then it will take longer time to show the Menu.
This tricks does not make any difference actually. But learning it is not a bad Idea. Is it?
Hope you have enjoyed it. Cheers :)
File name Purpose
This tricks does not make any difference actually. But learning it is not a bad Idea. Is it?
Hope you have enjoyed it. Cheers :)
............................................................................................................................................
Control Panel Files [CPL's]
File name Purpose
-----------------------------------------------------------------------
Access.cpl Accessibility properties
Appwiz.cpl Add/Remove Programs properties
Desk.cpl Display properties
FindFast.cpl FindFast (included with Microsoft Office for Windows 95)
Inetcpl.cpl Internet properties
Intl.cpl Regional Settings properties
Joy.cpl Joystick properties
Main.cpl Mouse, Fonts, Keyboard, and Printers properties
Mlcfg32.cpl Microsoft Exchange or Windows Messaging properties
Mmsys.cpl Multimedia properties
Modem.cpl Modem properties
Netcpl.cpl Network properties
Odbccp32.cpl Data Sources (32-bit ODBC, included w/ Microsoft Office)
Password.cpl Password properties
Sticpl.cpl Scanners and Cameras properties
Sysdm.cpl System properties and Add New Hardware wizard
Themes.cpl Desktop Themes
TimeDate.cpl Date/Time properties
Wgpocpl.cpl Microsoft Mail Post Office
....................................................................................................
Installing Modem. Wrong Comm Port.The reason that your modem is going to COM3 is because COM2 is active on the motherboard, here is
what you should do in details: 1. Start > Settings > Control Panel 2. Click on Device Manager 3. Expand the modem section 4. Remove the modem 5. Restart your system 6. When you see in DOS the HIT DEL TO ENTER SETUP, do that: 7. In the BIOS I want you to go to where it says COM2 and its address, and DISABLE it, put it to NONE. 8. Now let the system start 9. In windows let it detect your modem, BUT use your modem installation
Rebuild System files with Sys.com CommandCopy your SYS.COM to your startup disk, it's in your C:\WINDOWS\COMMAND directory. Then boot to Dos and switch to A:\> and type "SYS C:" no qoutes then [Enter]. This will rebuild your IO.SYS, COMMAND.COM and MSDOS.SYS on your harddrive. Then try rebooting. If no luck, read on.
Extract a new Win.comYou can't extract Win.com as it is created by windows 95 during install. You can, however, extract a file called Win.cnf and rename it Win.com, which is what occurs during the windows setup. To extract from CD, 1st Change Directories to the X:\WIN95> prompt, where X is your CD-ROM's drive letter. Then type the following:
EXTRACT /A /L C:\Windows WIN95_02.CAB WIN.CNF
You Need a Boot MenuYou can do this in windows, I think Dos is a better way. Boot and Shutdown To Real Dos Mode First, configure your system to boot
to DOS: At you Dos Prompt type; ATTRIB -H -S -R -S MSDOS.SYS
Then type: Edit MSDOS.SYS.
In the MSDOS.SYS file, make this changes.
[Options]
BootGUI=0
BootKeys=1
BootMenu=1
LOGO=0
BootDelay=0
After you save and exit EDIT Type ATTRIB +H +S +R +S
Reboot to a new menu. .........................................................................................................................BootStrap; Phase 1, 2, 3 and 4Phase 1: Hardware phase Power supply stabilizes voltages, asserts Power Good line to mobo CPU rolls; hds, fans and some other devices initialize themselves Phase 2: BIOS hardware phase BIOS initializes, checks crucial hardware, checks CMOS checksum Searches UMBs for ROM signatures, passes control to init (VGA splash) Loads chipset settings, sizes/checks RAM, builds equipment list (POST) BIOS splash screen displayed PnP extension queries and activates devices, checks ESCD data PnP-identified devices explained If changes, ESCD data is rebuilt (Updating ESCD...) Checks "advanced" CMOS for boot device test order Tests each device for boot signature end of 1st sector
If finds boot signature, loads that sector and jumps into it Else jumps to IBM cassette BASIC or "No ROM BASIC" etc. Phase 3: Master Boot Record phase It is at this point that EZIDE, Disk Manager, some viruses etc. run If diskette, boot sector loads OS however it chooses; IO.sys etc. If hd, partition table's 4 entries checked for marker with bit 7 set Error if no active partition found Else active partition table entry consulted for start address Check for boot sector marker at end 1st sector of partition Error if not found Else jumps into 1st sector of partition Phase 4: Operating system phase From here on, what happens depends on the operating system It is at this point the other "pre-file" viruses run Case of successfully-installed Win95 will be described Partition loader loads IO.sys; "Windows 95 is loading..." Win95's IO.sys will interpret MSDOS.sys settings, act accordingly If no Fn keystroke or bad exit to the contrary, interprets Config.sys Initial interpretation of registry (*** here or where?)
If no DOS=NoAuto, will set and load Win95 auto defaults as per:
LastDriveHigh
FilesHigh
BuffersHigh
StacksHigh
FCBSHigh
DOS=UMB,High (NB if Single, UMB only possible if Emm386 loads)
Set Prompt=$p$g (*** here or earlier?)
Set Path={winbasedir};{winbasedir}\Command (*** here or earlier?)
Device={winbasedir}\HiMem.sys
DeviceHigh={winbasedir}\IFSHlp.sys
DeviceHigh={winbasedir}\SetVer.exe
Rest of Config.sys interpreted
Check for C:\AutoExec.bat; if exists, Command.com loaded to interpret
If no DOS=Single (Config.sys) or BootGUI=0 (MSDOS.sys), Win.com loads
(*** from this point on, exact order of events unclear; ### waypoints)
Win.com displays {winbasedir}\Logo.sys (*** here or earlier?) (###)
Registry drivers, PnP etc. loaded
System.ini drivers etc. loaded
Desktop paints in, mouse pointer; Task Manager is clickable (###)
Logon dialog appears, if appropriate (###)
0th instance Explorer launches, desktop icons, Desktop clickable (###)
Registry Run, RunOnce, RunServices, RunServicesOnce interpreted
Win.ini Run= and Load= interpreted
"Welcome to Windows" dialog launched, unless suppressed (###)
{start menu}\StartUp group items launched At this point, boot process is complete.
what you should do in details:
EXTRACT /A /L C:\Windows WIN95_02.CAB WIN.CNF
to DOS: At you Dos Prompt type; ATTRIB -H -S -R -S MSDOS.SYS
Then type: Edit MSDOS.SYS.
In the MSDOS.SYS file, make this changes.
[Options]
BootGUI=0
BootKeys=1
BootMenu=1
LOGO=0
BootDelay=0
After you save and exit EDIT Type ATTRIB +H +S +R +S
Reboot to a new menu.
If finds boot signature, loads that sector and jumps into it Else jumps to IBM cassette BASIC or "No ROM BASIC" etc.
If no DOS=NoAuto, will set and load Win95 auto defaults as per:
LastDriveHigh
FilesHigh
BuffersHigh
StacksHigh
FCBSHigh
DOS=UMB,High (NB if Single, UMB only possible if Emm386 loads)
Set Prompt=$p$g (*** here or earlier?)
Set Path={winbasedir};{winbasedir}\Command (*** here or earlier?)
Device={winbasedir}\HiMem.sys
DeviceHigh={winbasedir}\IFSHlp.sys
DeviceHigh={winbasedir}\SetVer.exe
Rest of Config.sys interpreted
Check for C:\AutoExec.bat; if exists, Command.com loaded to interpret
If no DOS=Single (Config.sys) or BootGUI=0 (MSDOS.sys), Win.com loads
(*** from this point on, exact order of events unclear; ### waypoints)
Win.com displays {winbasedir}\Logo.sys (*** here or earlier?) (###)
Registry drivers, PnP etc. loaded
System.ini drivers etc. loaded
Desktop paints in, mouse pointer; Task Manager is clickable (###)
Logon dialog appears, if appropriate (###)
0th instance Explorer launches, desktop icons, Desktop clickable (###)
Registry Run, RunOnce, RunServices, RunServicesOnce interpreted
Win.ini Run= and Load= interpreted
"Welcome to Windows" dialog launched, unless suppressed (###)
{start menu}\StartUp group items launched